In the present era, having a reliable and stable internet connection is more than anything. Similarly, to run this digital world, the Netgear brand offers a range of networking devices, such as N600 routers. These are easy to login but to use them to their full potential, the Netgear N600 router setup is crucial.
Additionally, advanced routers have a user-friendly interface for easy configuration. Likewise, this dual-band wireless gateway is available as a router cum modem model or you can buy it as a router only. Further, after buying it, it is necessary to understand how to setup Netgear N600 router efficiently. Therefore, we share this guide with you to assist with the router configuration, keep reading this!
Explain the quick steps for Netgear N600 router setup.
Generally, configuring the Netgear router considers very simple if you have a smartphone or a computer. Likewise, you can choose the web GUI or the application method to carry out the setup process.
Before starting the configuration, ensure to have an active internet connection, web address, Nighthawk app, ethernet cables, admin details, etc. ready with you. After that, go ahead with the steps mentioned below to understand how to setup Netgear N600 router. Have a look beneath:
Web GUI (192.168.1.1 IP)
- To start with, ensure your networking device is powered on.
- Now, link your computer/laptop/Macbook to the Netgear N600 router’s network.
- You can join this network as a wifi or can connect the ethernet cable.
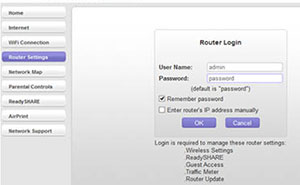
- After that, activate any web browser and write in the routerlogin.net web address or 192.168.1.1 IP in the browser bar.
- Next, key in the valid admin details on the login window shown to you.
- If you are a newbie, then you must create a new account by entering the necessary details.
- After logging in, you visit the Netgear N600 router setup screen.
- Moving further, tap on the Setup Wizard>Advanced>Detect Connection Type>Yes.
- Hereon, click on the WiFi Settings and modify the network name (SSID) and password if using the default ones.
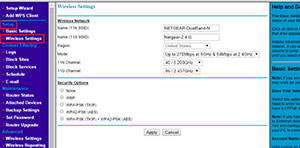
- Next to this, explore the setup wizard and configure the additional settings, such as Guest Network, Parental controls, Network Settings, etc.
- Follow the guidelines shown to you on the screen to customize these settings.
- Now, tap on Apply/Save to implement the changes you made.
- Finally, you are all set with the Netgear N600 router configuration.
Nighthawk application
- Firstly, join the Netgear router network by visiting the wifi settings of your smartphone.
- Ensure that you have an updated version of the Nighthawk application on your smartphone.

- Next, run the app and you see two options “Existing User” and “New System Setup,” on the login screen.
- Now, choose the suitable option and enter the accurate admin credentials on the login window.
- After logging in, you reach the setup wizard of the Netgear router.
- Confirm that your networking device gets enough power supply and is powered on. Also, ensure this is connected to the modem.
- Hereon, select the given options and tap on Next and you see the “Router Detected” option.
- You see a screen asking to create a new wifi name and password.
- So, enter a new SSID name and security key in the given fields.
- Below this, you see a notification to use these details as an Admin for the Netgear router.
- Toggle the given tab as “Enable” or “Disable” to use this option accordingly.
- Moving further, set the Security Questions and tap on Next to apply the recent configurations.
- Again, you visit the home dashboard of the router and display multiple options, such as Speed Test, WiFi Settings, Parental Controls, and more.
- Go ahead with the instructions that appear on the screen to configure the further settings.
- In the end, the Netgear N600 router setup process ends successfully.
Wrapping up
On the whole, this informative guide will walk you through the complete Netgear N600 router setup process. You find two methods to carry out the router configuration with the elaborative steps. Hope you find this brief guide helpful to configure your networking device without any hassle.